You've roasted a beautiful Thanksgiving turkey! Here's an easy step-by-step guide to carving it!
🦃 Let the turkey rest before carving
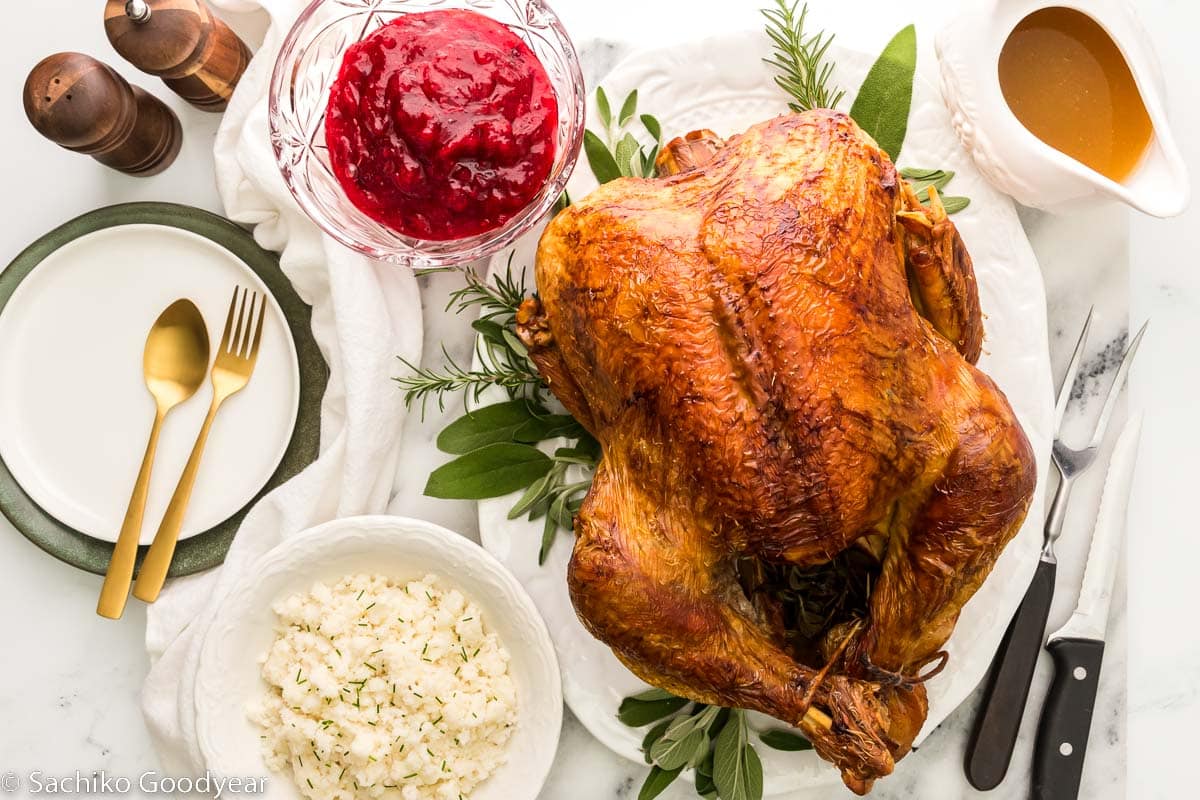
This is the perfect time to present your beautifully roasted bird, the centerpiece of the Thanksgiving table.
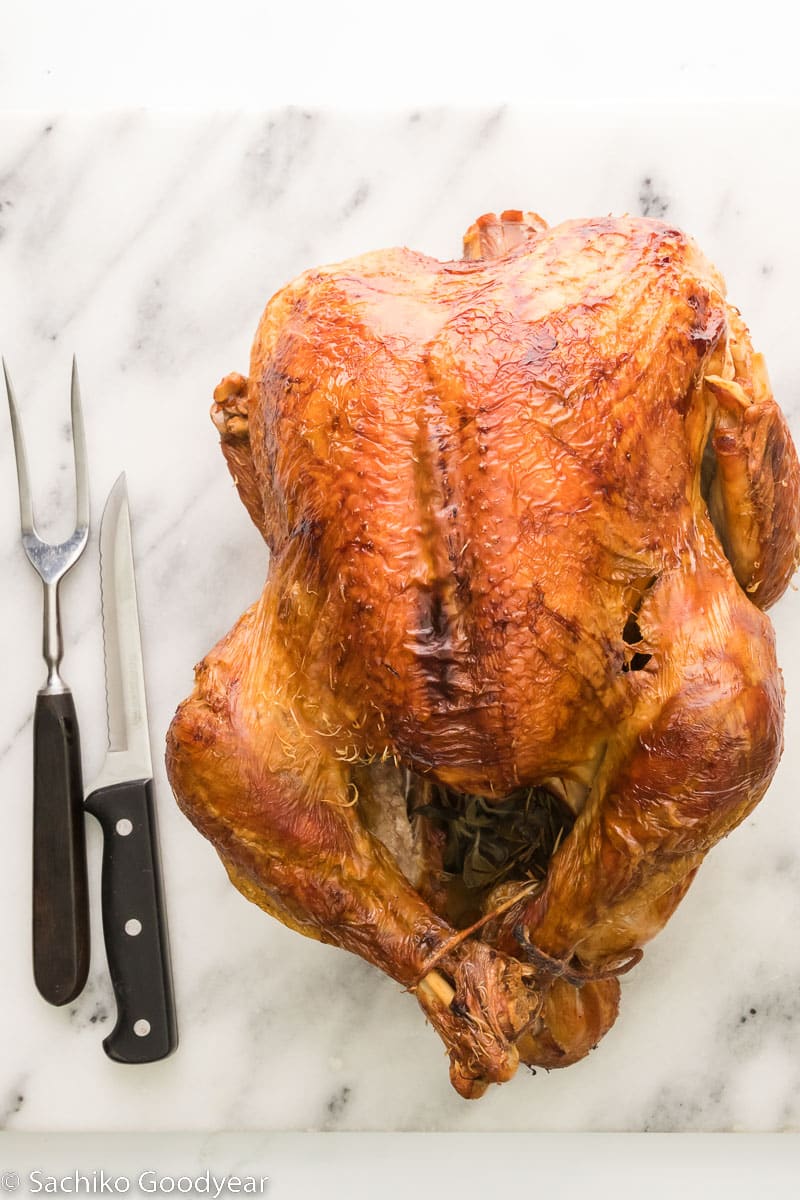
Perhaps the most important thing to remember about the proper way to carve a turkey is giving it an ample 20-30 minute resting period.
You’ve spent hours prepping, brining, rubbing, trussing, potentially spatchcocking, and roasting or frying the centerpiece of your holiday table to golden, juicy perfection. The last thing you want to do is dry it out by rushing!
Once the turkey is done cooking, tent it with foil and let it rest in a warm, draft-free area. This cooling period allows the proteins to relax, which then allows the naturally occurring juices to redistribute themselves into the meat. If you skip this step, you’ll lose a ton of juicy goodness to your cutting board.
You are welcome to remove any trussing twine at this stage.
Setup a carving station
Consider where you’ll be carving your turkey. I personally prefer the kitchen where the countertops are higher, there’s a sink nearby, and there is plenty of room to work. That said, if you prefer to carve the bird at the table, that’s fine too!
If you’re working in the kitchen, I suggest placing your (warmed) serving platter on your dominant-hand side next to the cutting board. Before you even start, tear off a piece of aluminum foil that is longer than the serving platter to help trap the heat as you work.
If you’re working at the dinner table, you’ll probably need to put the serving platter in front of the cutting board. Also, make sure you have a bowl of warm water handy since you won’t be near a sink.
No matter where you’re working, make sure you have your freshly sharpened knife and towels near your dominant hand and the tongs near your non-dominant hand. Now you’re ready to start carving!
🔪 Equipment you'll need
Carving a turkey goes smoothly with the right tools at your disposal! This is everything you’ll need to grab:
- Sharp knife - A kitchen knife or a boning knife (a thinner blade) will work fine.
- Cutting board - Opt for one that has a deep juice groove to catch all the tasty drippings. Not only will your counters stay cleaner, but you’ll have extra turkey jus flavor to add to your gravy. If you don't have one, keep a kitchen towel handy to wipe up spills.
- Serving platter - To serve your carved turkey.
- Aluminum foil - For covering the meat and keeping it warm!
- Clean kitchen towels or paper towels - After resting the turkey it may still be quite hot. You may need a little buffer between your hands and the meat, which is where towels come in. I'm not gonna lie, it can get messy and you'll be glad to have towels on hand.
- Tongs - For holding the meat still as you slice it, as well as transferring it to the platter and serving!
- Apron - For keeping your holiday best looking clean and tidy.
👩🏻🍳 Easy step-by-step instructions
Once your turkey has had ample time to rest, it’s time to start the show! Come along with me as I teach you each step of how to properly carve a turkey.
To retain heat, place the sliced meat on your serving platter and cover with foil as you go.
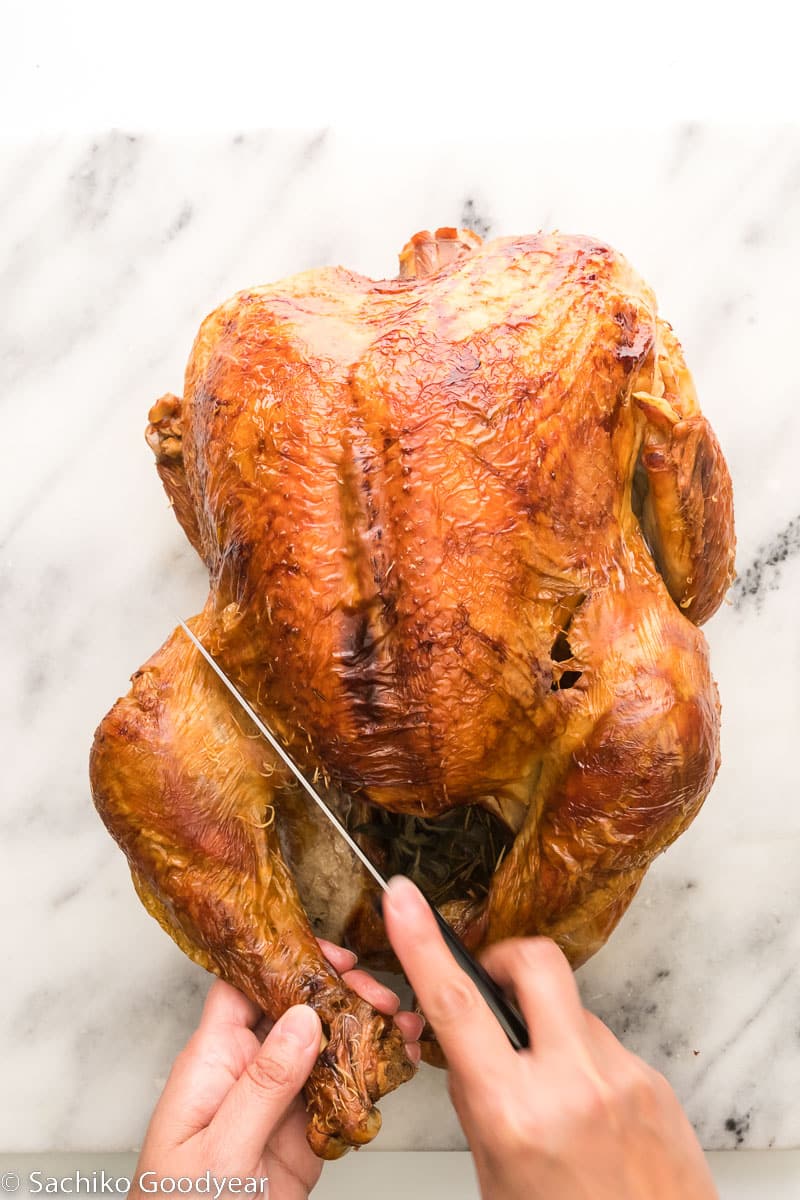
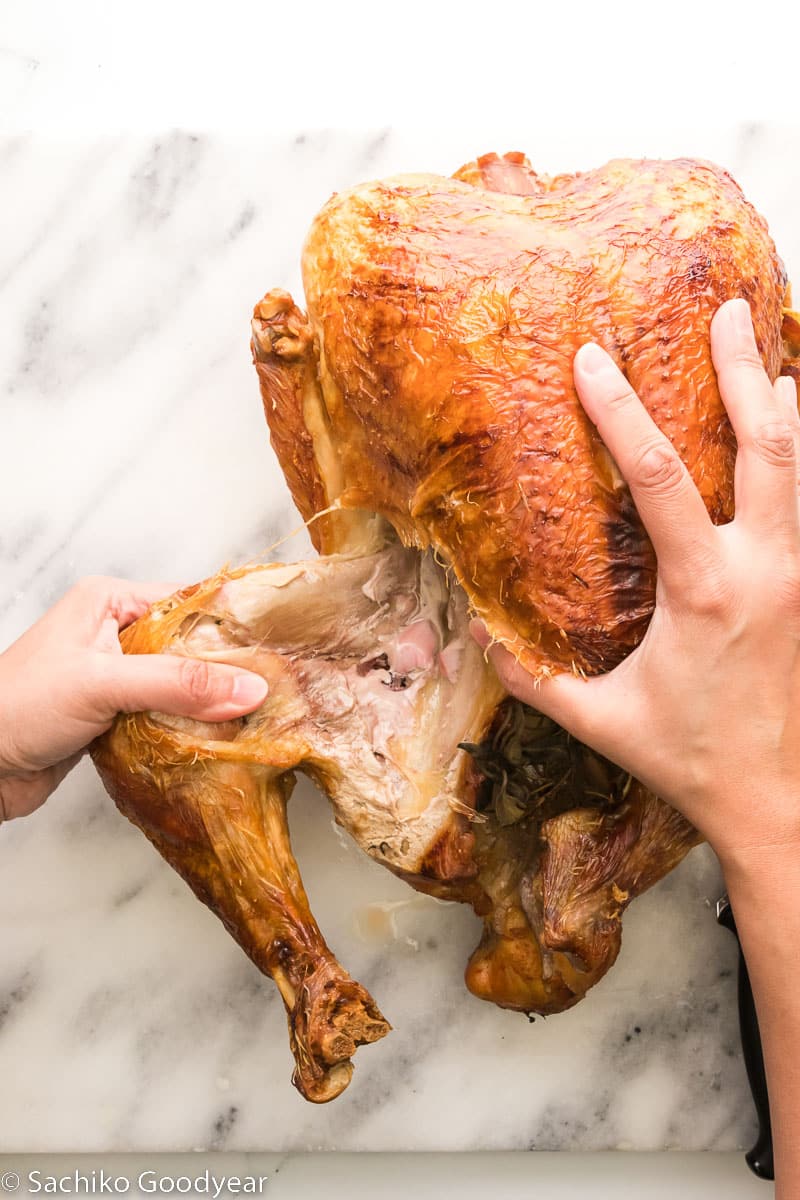
Step 1: Remove legs & thighs
Grab hold of a leg and pull it slightly away from the bird. Use your knife to cut along the fold of skin between the breast and thigh, cutting all the way down to the joint.
Step 2: Remove legs & thighs
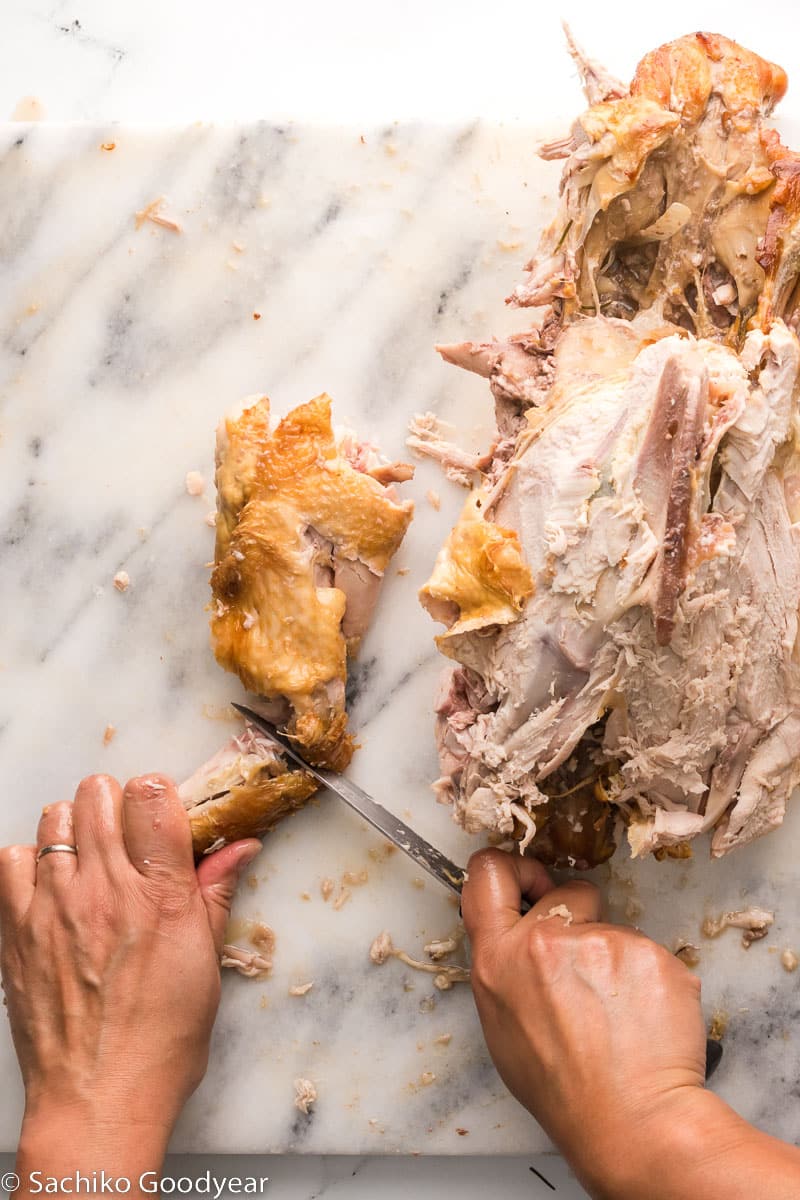
Fold the leg outward to expose the thigh. Push up from the backside of the turkey thigh to pop the joint. Use your knife to carefully cut around the bone and separate the entire leg from the body. Repeat on the other side.
Step 3: Separate thigh & leg
Wiggle the thigh and leg back and forth to locate the joint that connects them. Slice through the skin and meat down to the joint, then use your hands to gently pop it. Use the tip of your knife to cut through the joint. Repeat on the other leg.
Step 4: Remove Thigh Bone
Flip one thigh so the skin side faces down. Make a cut along one side of the thigh bone to remove a large chunk of meat. Make another cut along the other side to remove the bone completely.
Step 5: Slice thigh meat
Flip the meat chunks so the skin is facing up, then cut it against the grain into roughly ½-inch wide pieces. Moving quickly, place the sliced turkey on your warmed platter and cover it with foil. Repeat on the other leg.
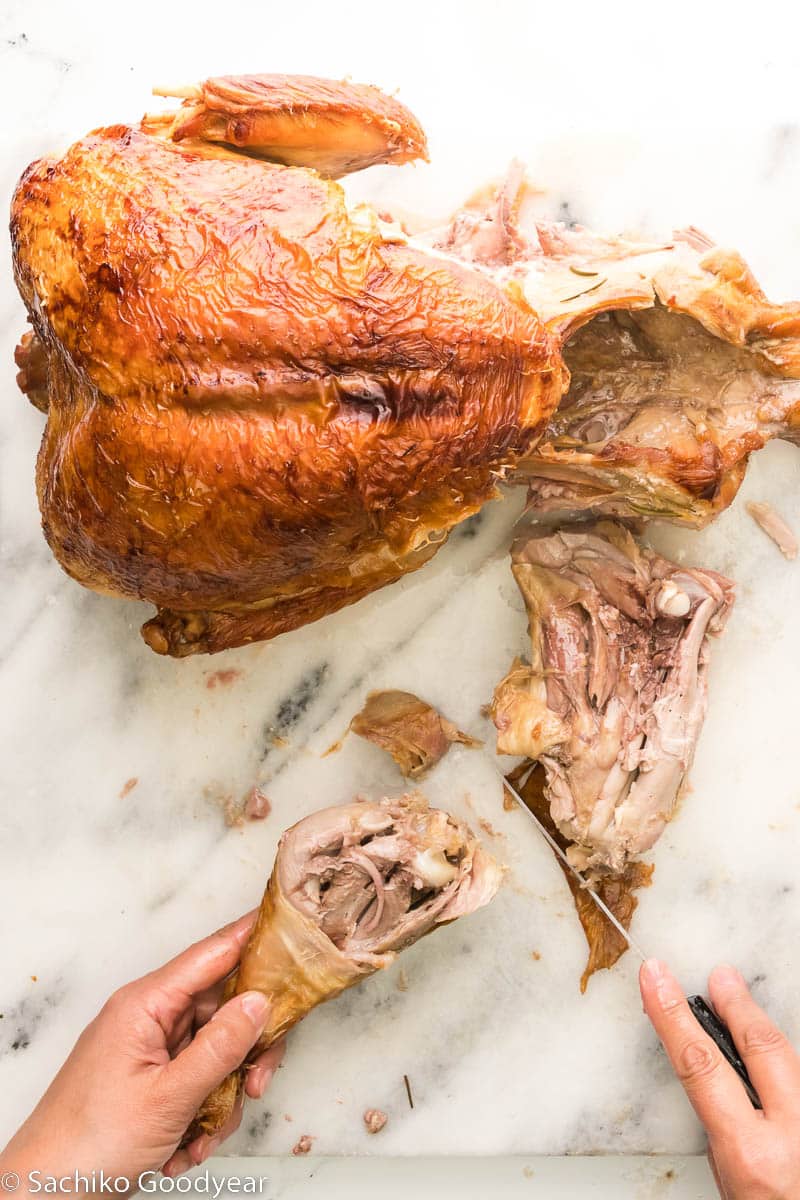
Step 6: Remove breast meat
Locate the breastbone and slice down along the bone until the breast meat is completely separated from the bone.
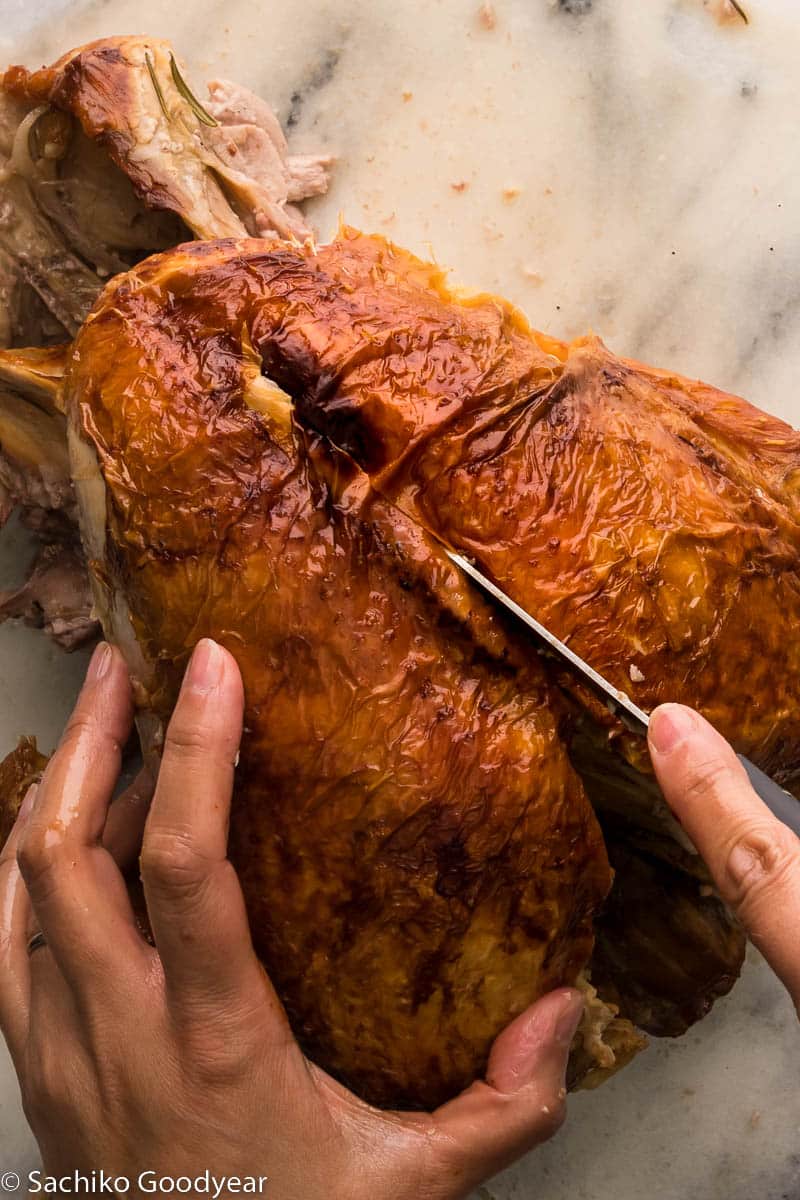
Step 7: Where is the wishbone?
The lucky wishbone is an inverted Y shaped bone located above the neckbone. To find it, position the bird with the tail facing away from you, breast-side up. Using the tip of your knife, cut a slit along both the inside and the outside of each branch of the Y. Now, cut a shallow, horizontal slit where the two branches of the wishbone meet.
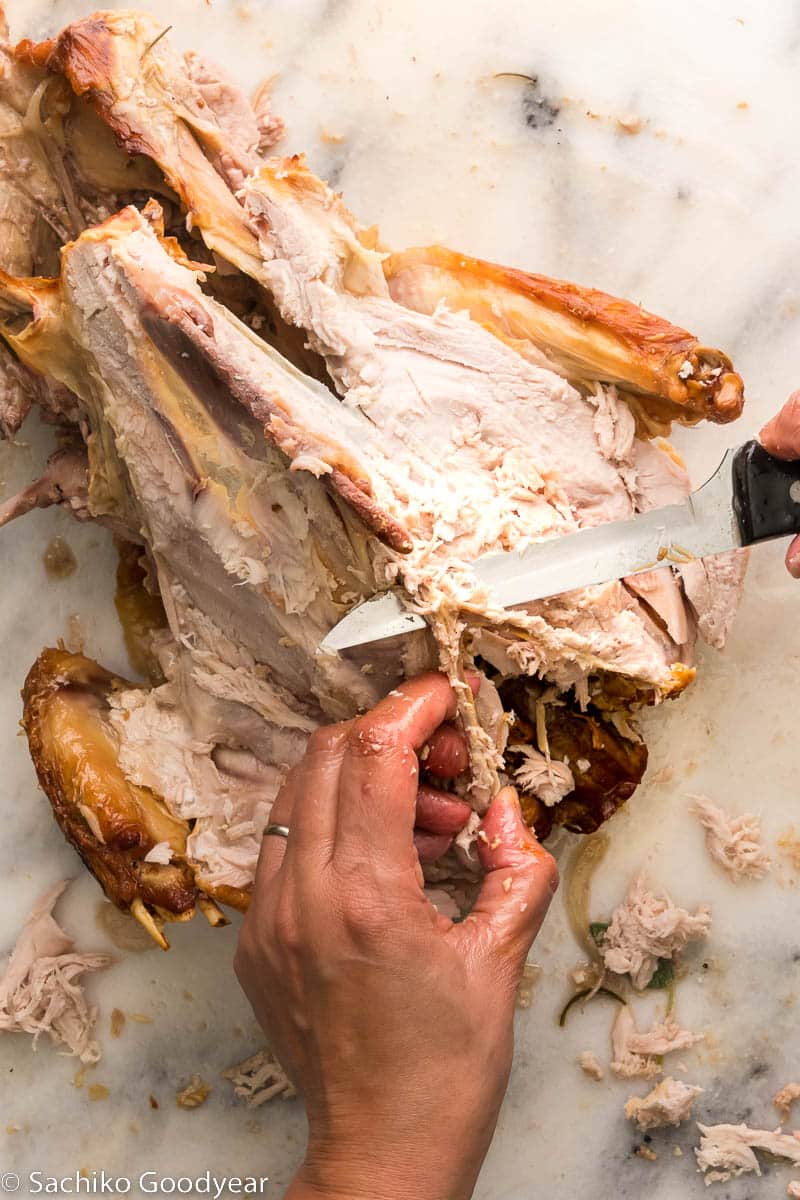
Step 8: Remove the wishbone
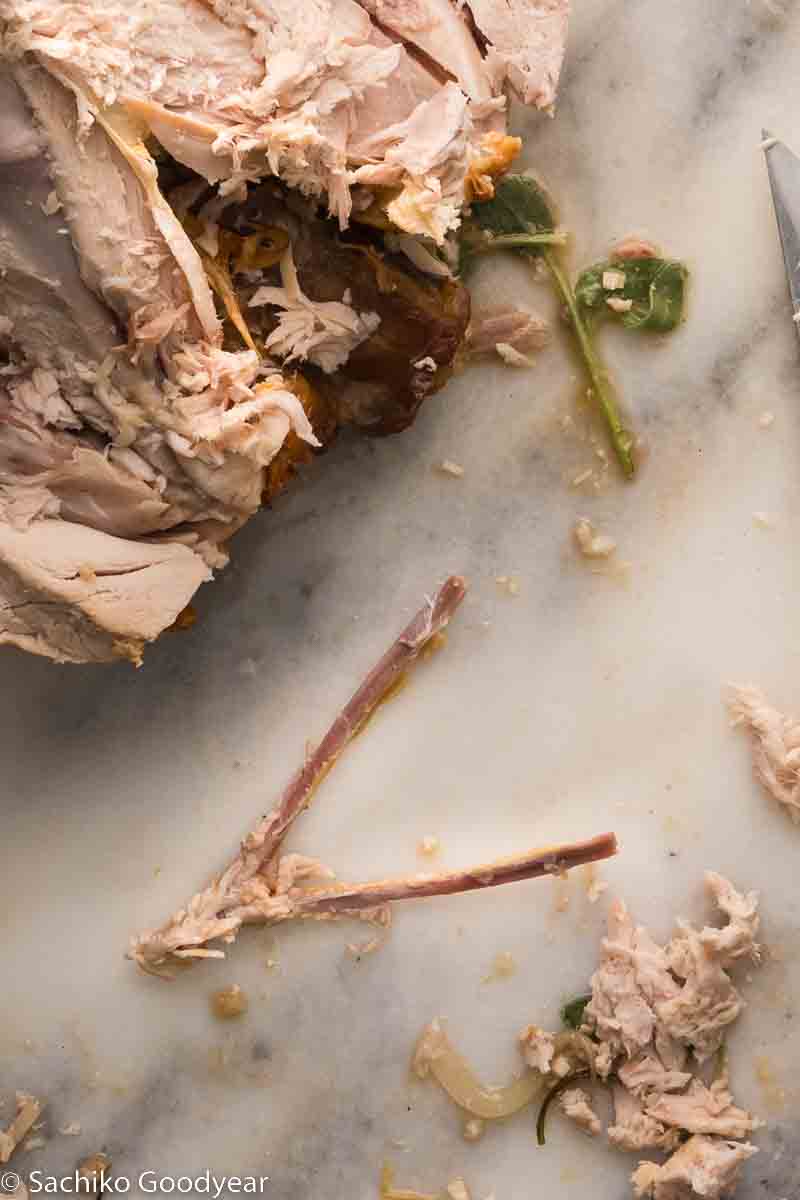
Using your index finger and thumb, grab the place where the two branches meet and gently pry the wishbone loose. If it is stuck, continue to make small incisions as needed to remove it.
Set the wishbone aside so you can make a wish on it later!
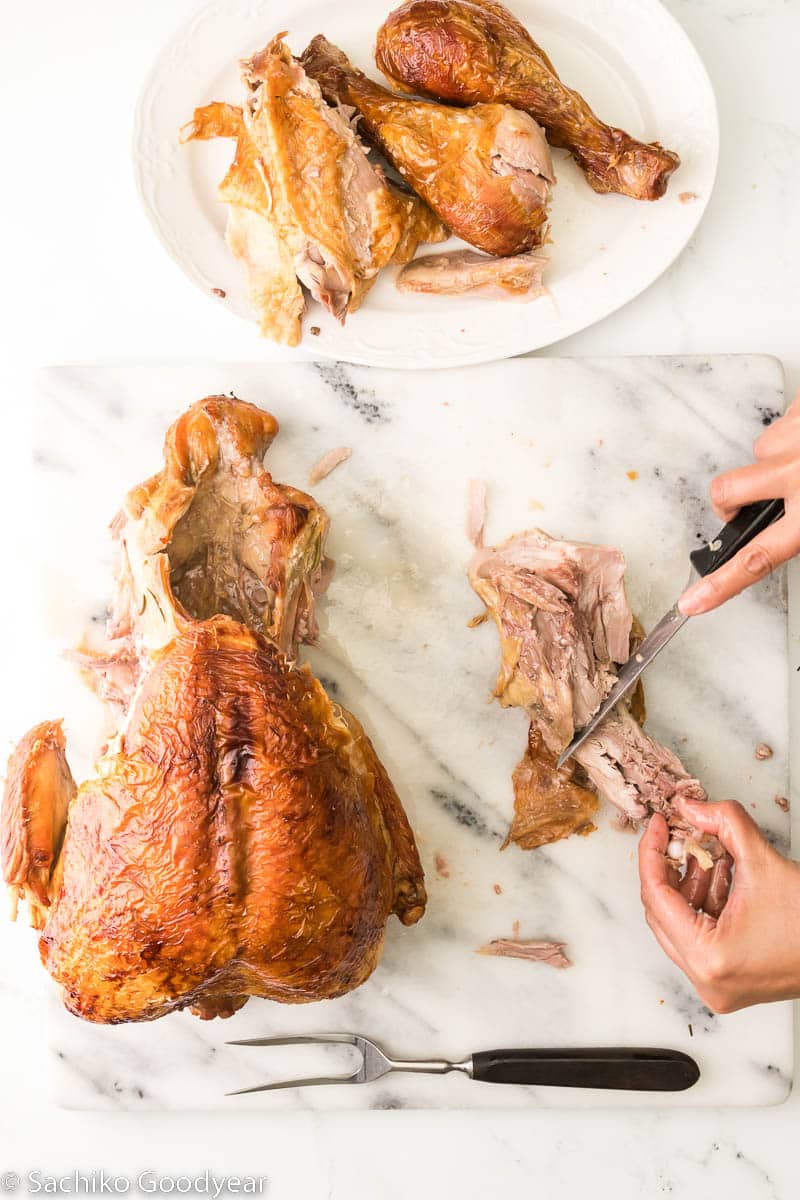
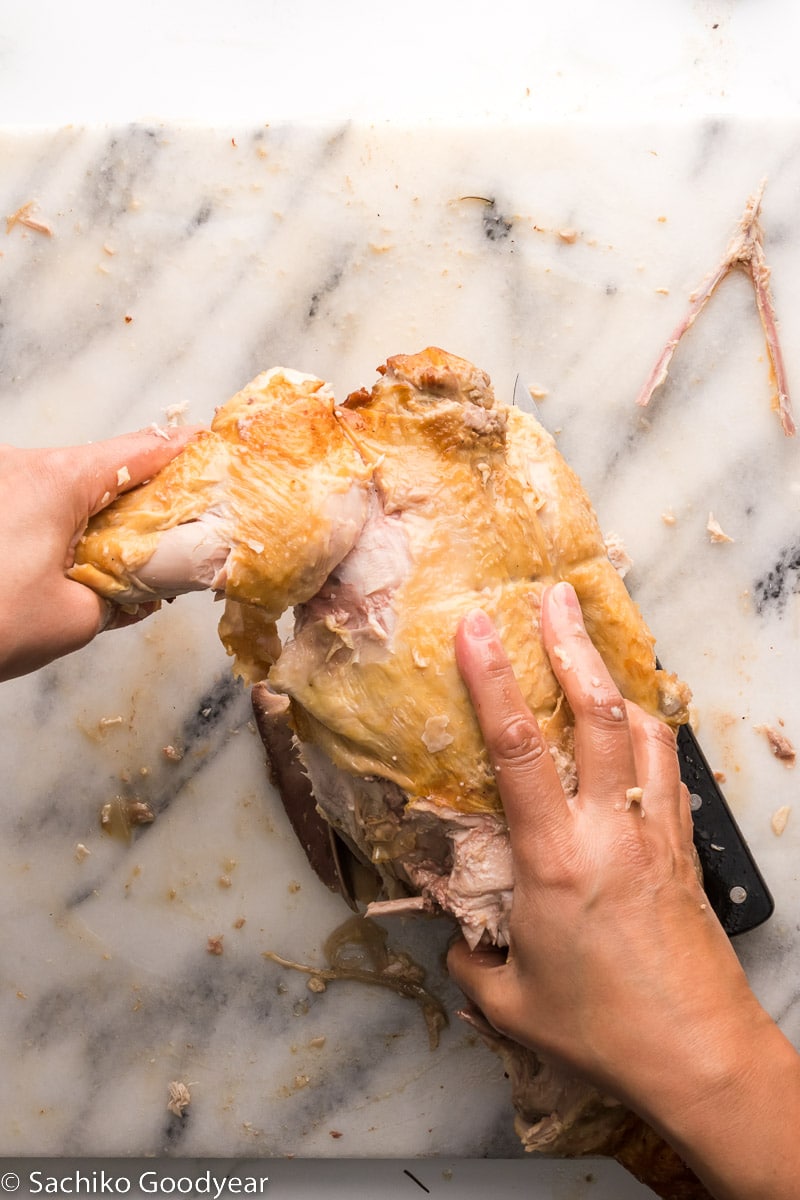
Step 9: Remove wings
Wiggle one wing back and forth to locate the shoulder joint. Slice down to the joint, then use your hands to pop it out before using the tip of your knife to slice through it. Repeat on the other wing.
Step 10: Separate the wing and drumette
A drumette is the thick first section of a chicken wing that resembles a drumstick. Articulate the wing back and forth to find the elbow joint. Pop it, then slice through to separate the pieces. If desired, remove the wing tips by slicing through the wrist joint.
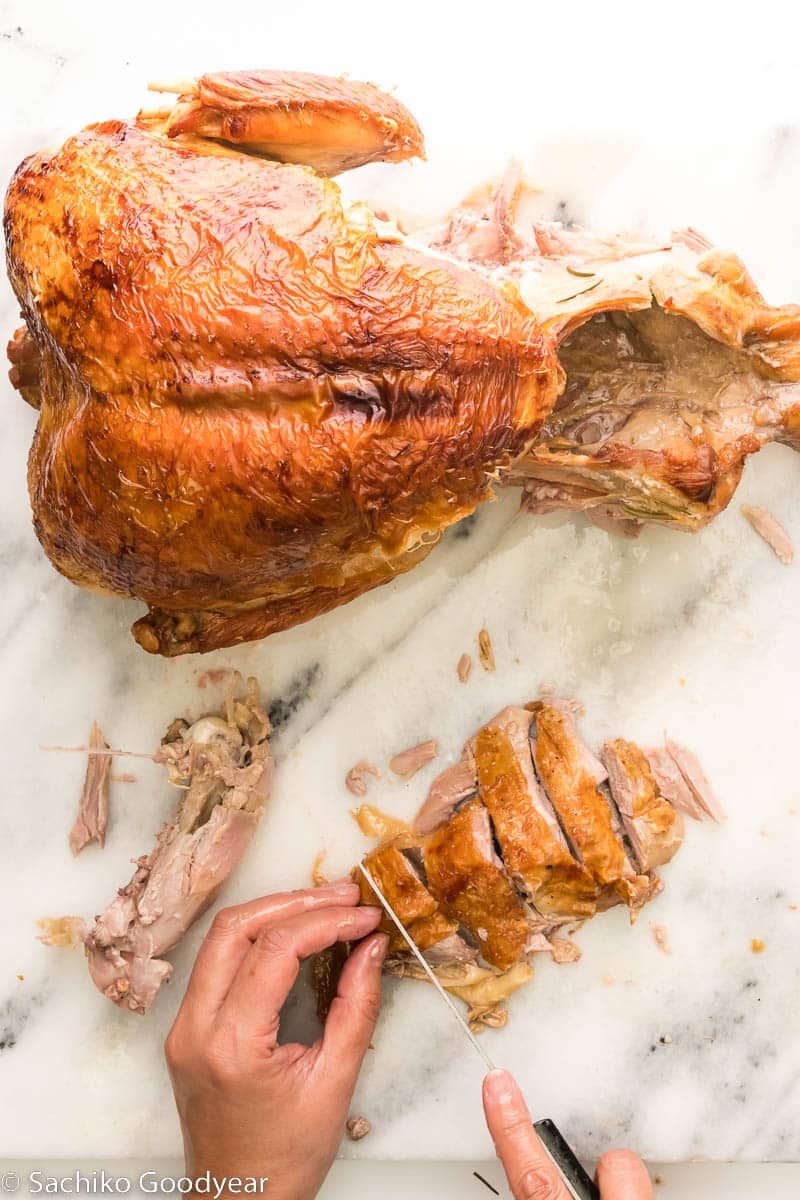
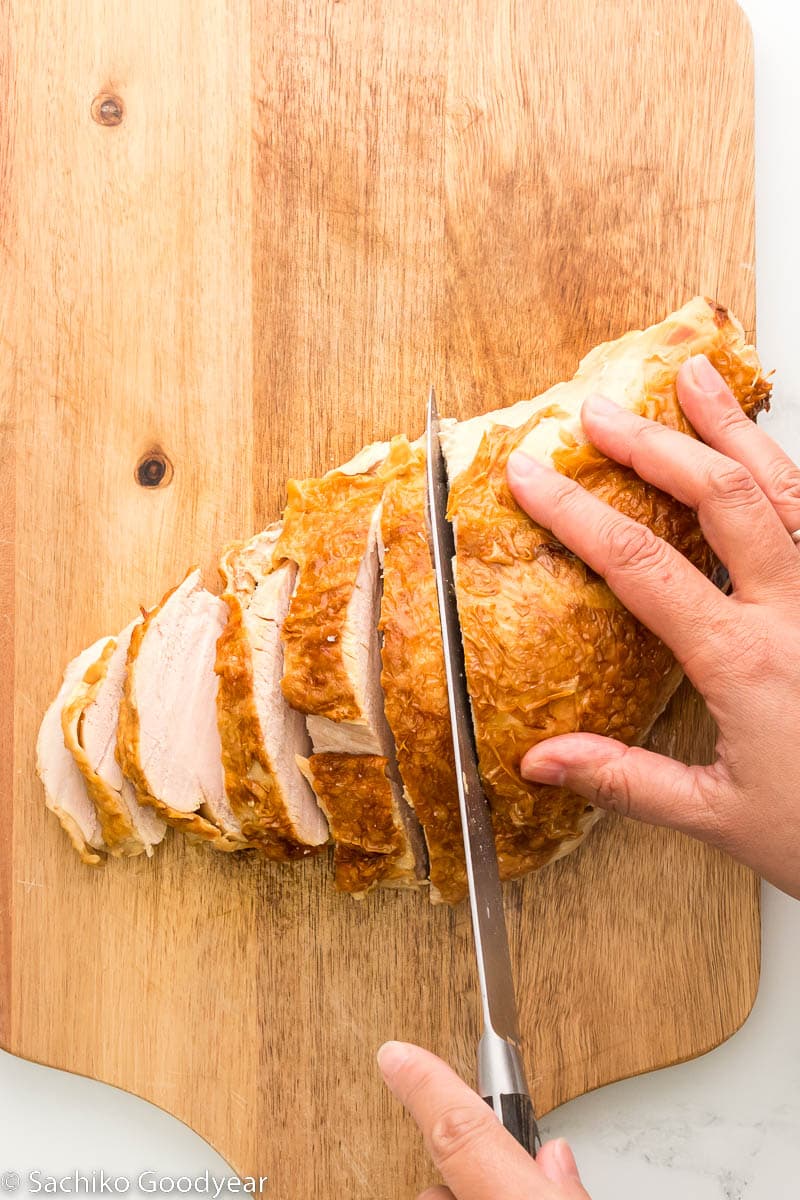
Step 11: Slice & plate breast meat
With the skin side up, slice the turkey breasts on a bias, working against the grain. I suggest roughly ½-inch wide pieces as thicker pieces won’t dry out quite as much as thin slices.
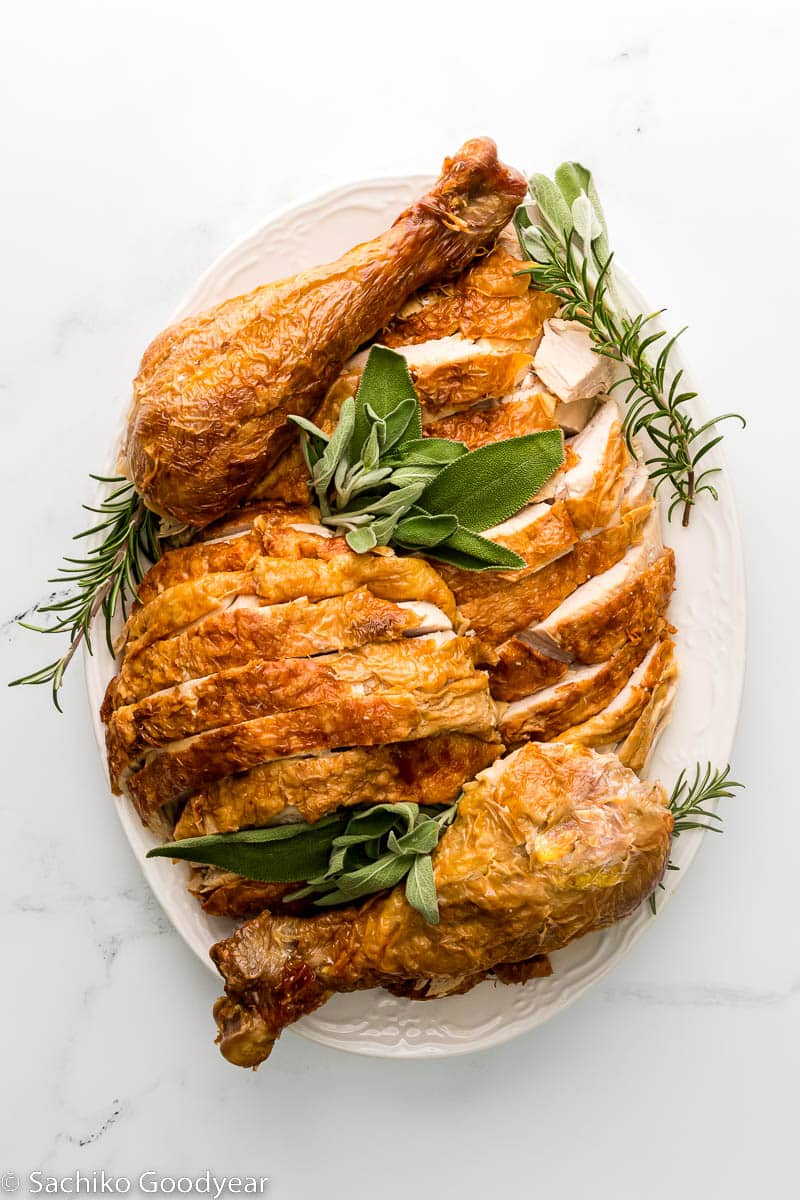
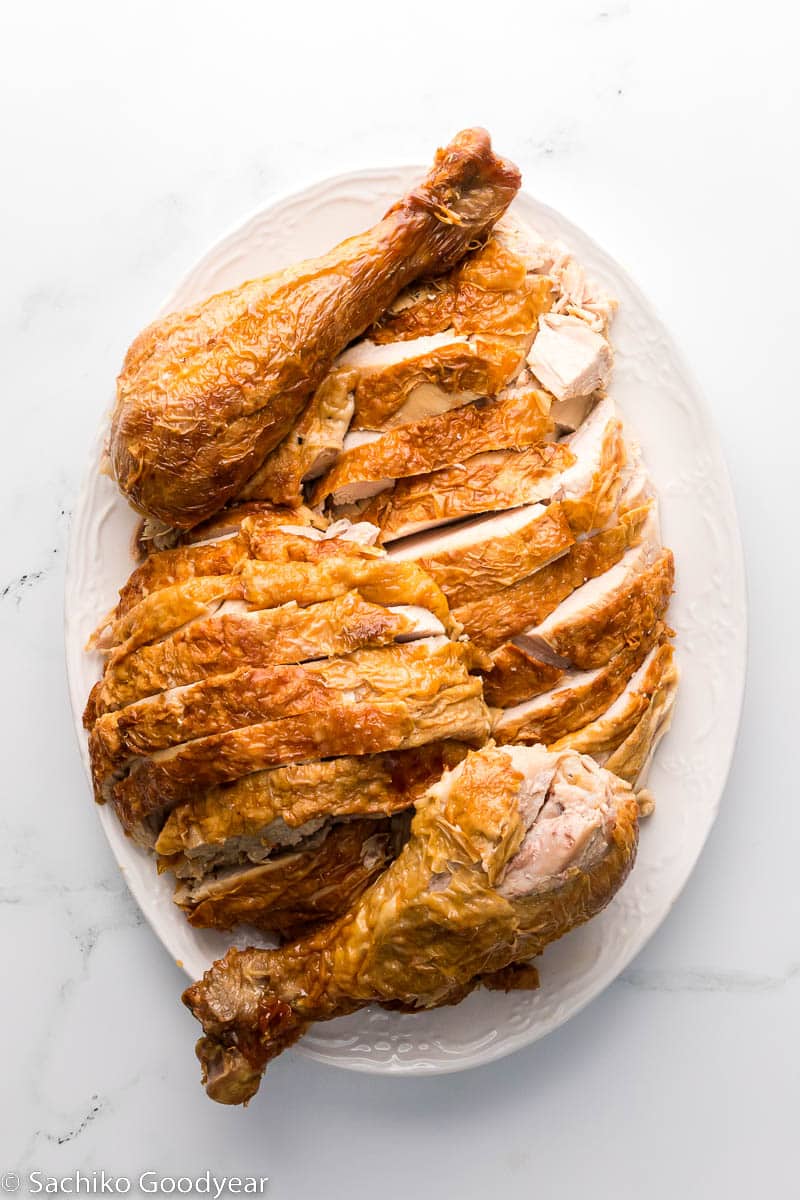
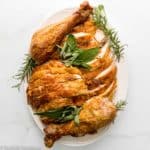
Step 12: Arrange meat on platter
Arrange sliced meat, legs, drumettes and wings on a warm serving platter. Make a mound of the messier pieces beneath the neater looking pieces. I like to separate the dark meat from the white meat. Cover with foil, to keep warm, until ready to serve.
🛎 How to serve
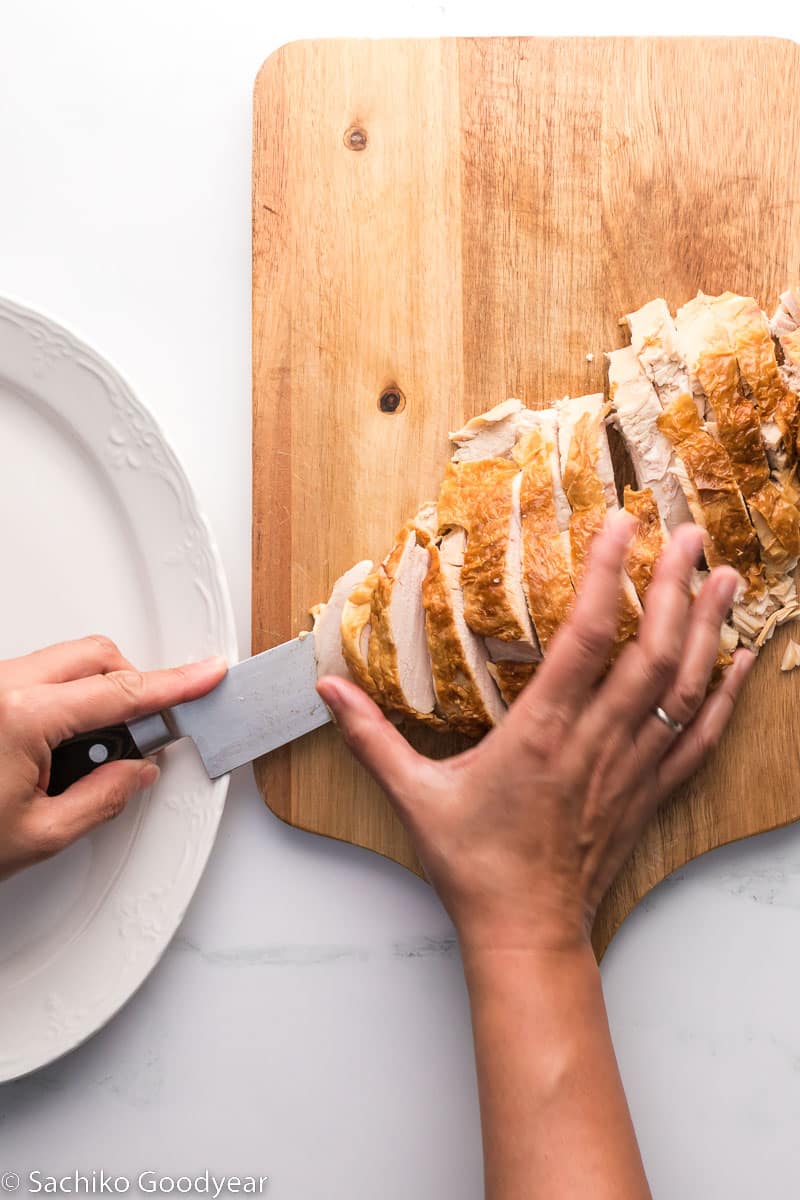
To neatly transfer sliced meat from the cutting board to a serving platter, slide a kitchen knife under the slices and hold them in place with the other hand.
Serve immediately or keep warm, by tenting with aluminum foil, until ready to serve. Now is a good time to decorate the platter with garnishes such as fresh herbs.
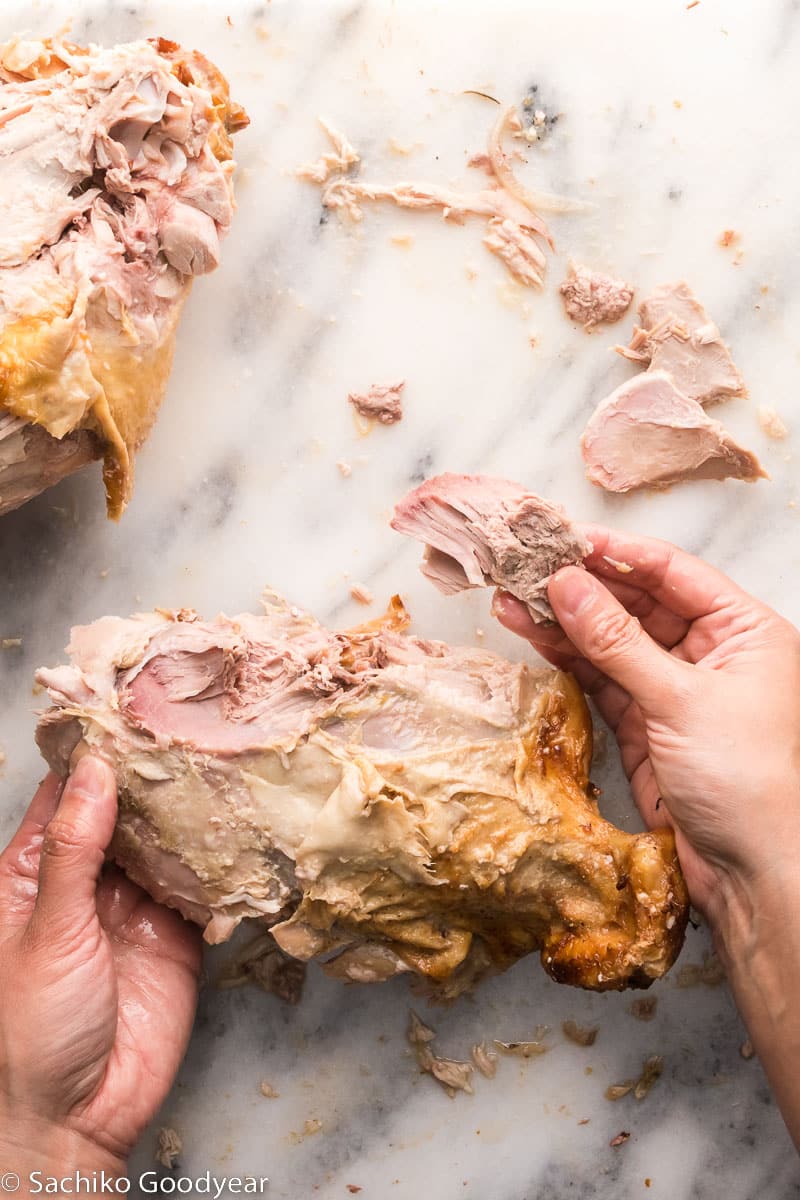
Pick the carcass
There’s good meat on the carcass that would be excellent for a turkey pot pie, turkey salad or turkey soup. Be sure to pick the meat off the carcass before using the carcass for broth.
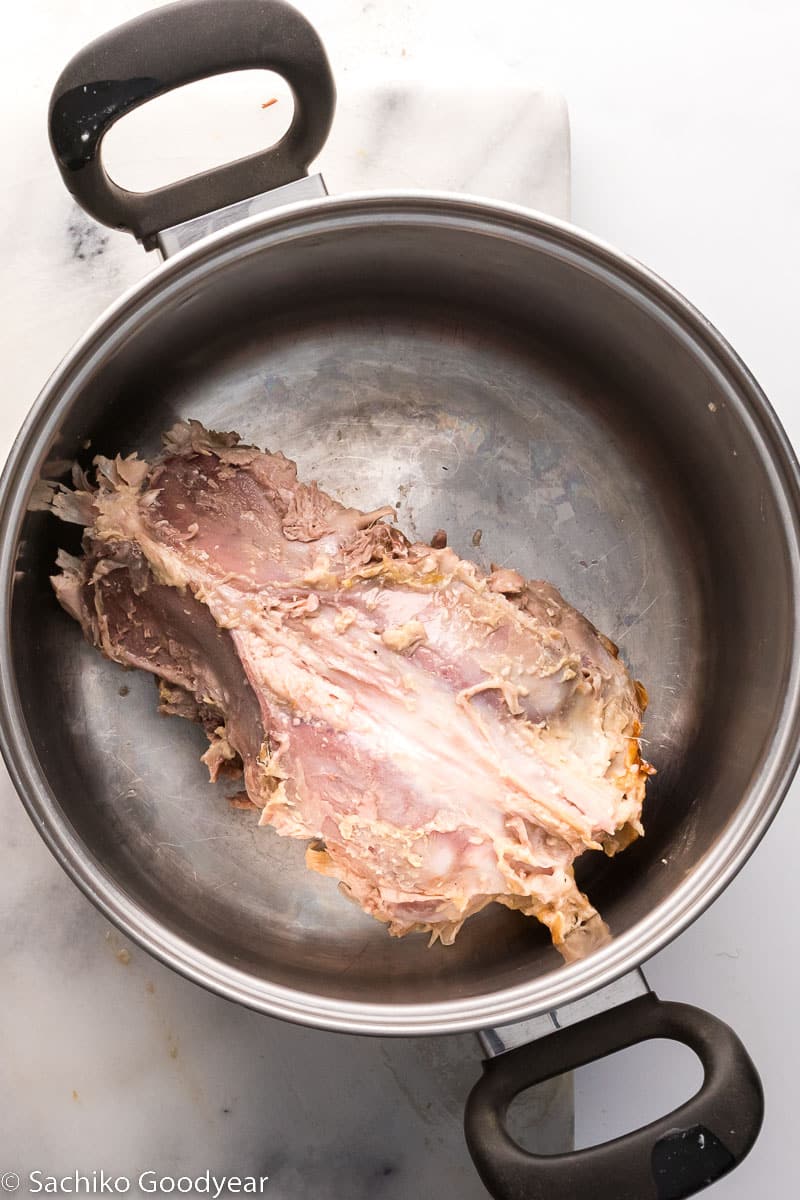
Make turkey stock
Once the carcass is picked clean, toss the carcass, thigh bones, wing tips, turkey tail, and any remaining juices and skin into a large stock pot.
Feel free to toss in other kitchen scraps like carrot ends, the root ends of celery hearts, herbs, and garlic & onion skins in the pot, too. Onion skins give the stock a lovely golden color. Cover with a few inches of cold water, bring to a boil, skim and set it to simmer for 2-6 hours. Then, let cool and strain the stock into clean, lidded containers. I use Ball jars.
Fresh turkey stock will keep in the fridge for up to a week, or in the freezer for up to 6 months. Make sure to leave at least ½ - inch of headspace if you plan on freezing it so you avoid any messy overflow or breakage.
💭 Top tips
- Warm the serving platter in the oven or microwave before placing your freshly carved turkey on it to help maintain the heat until you get it to the dinner table.
- Keep clean towels on hand to protect your hands if the bird is too hot to touch, and to sop up any spills.
- Waste not, pick the carcass. There’s plenty of good meat on the carcass for turkey pot pie, turkey salad and turkey soup.
- Save the bones and carcass to make turkey stock.
🐿 How to store
Store leftover turkey in an airtight container in the refrigerator for up to a week.
❄️ How to freeze
Store leftover turkey in an airtight container in the freezer for up to 6 months.
🧐 Frequently asked questions
I recommend 20-30 minutes of rest time under tented foil for the juices to redistribute into the meat.
The steps are actually very similar to the ones described above, though they’re often easier since your bird is already butterflied. The only difference is that I recommend removing the wings before you remove the breasts to make it easier to maneuver your knife.
How to carve a turkey recipe card
- Total Time: 30 minutes
- Yield: 1 bird 1x
- Diet: Diabetic
Description
You've roasted a beautiful Thanksgiving turkey! Here's an easy step-by-step guide to carving it!
Ingredients
1 turkey
Instructions
- Remove legs & thighs. Grab hold of a leg and pull it slightly away from the bird. Use your knife to cut along the fold of skin between the breast and thigh, cutting all the way down to the joint.
- Fold the leg outward to expose the thigh. Push up from the backside of the turkey thigh to pop the joint. Use your knife to carefully cut around the bone and separate the entire leg from the body. Repeat on the other side.
- Separate thigh & leg. Wiggle the thigh and leg back and forth to locate the joint that connects them. Slice through the skin and meat down to the joint, then use your hands to gently pop it. Use the tip of your knife to cut through the joint. Repeat on the other leg.
- Remove thigh bone. Flip one thigh so the skin side faces down. Make a cut along one side of the thigh bone to remove a large chunk of meat. Make another cut along the other side to remove the bone completely.
- Slice thigh meat. Flip the meat chunks so the skin is facing up, then cut it against the grain into roughly ½-inch wide pieces. Moving quickly, place the sliced turkey on your warmed platter and cover it with foil. Repeat on the other leg.
- Remove breast meat. Locate the breastbone and slice down along the bone until the breast meat is completely separated from the bone.
- Where is the wishbone? The lucky wishbone is an inverted Y shaped bone located above the neck bone. To find it, position the bird with the tail facing away from you, breast-side up. Using the tip of your knife, cut a slit along both the inside and the outside of each branch of the Y. Now, cut a shallow, horizontal slit where the two branches of the wishbone meet.
- Remove the wishbone. Using your index finger and thumb, grab the place where the two branches meet and gently pry the wishbone loose. If it is stuck, continue to make small incisions as needed to remove it.
- Remove wings. Wiggle one wing back and forth to locate the shoulder joint. Slice down to the joint, then use your hands to pop it out before using the tip of your knife to slice through it. Repeat on the other wing.
- Separate the wing and drumette. A drumette is the thick first section of a chicken wing that resembles a drumstick. Articulate the wing back and forth to find the elbow joint. Pop it, then slice through to separate the pieces. If desired, remove the wing tips by slicing through the wrist joint.
- Slice & plate breast meat. With the skin side up, slice the turkey breasts on a bias, working against the grain. I suggest roughly ½-inch wide pieces as thicker pieces won’t dry out quite as much as thin slices.
- Arrange meat on platter. Arrange sliced meat, legs, drumettes and wings on a warm serving platter. Make a mound of the messier pieces beneath the neater looking pieces. I like to separate the dark meat from the white meat. Cover with foil, to keep warm, until ready to serve.
Notes
- To neatly transfer sliced meat from the cutting board to a serving platter, slide a kitchen knife under the slices and hold them in place with the other hand.
- Serve immediately or keep warm, by tenting with aluminum foil, until ready to serve. Now is a good time to decorate the platter with garnishes such as fresh herbs.
- Waste not, pick the carcass. There’s plenty of good meat on the carcass for turkey pot pie, turkey salad and turkey soup.
- Save the bones and carcass to make turkey stock.
- Prep Time: 20 minutes
- Cook Time: 10 minutes
- Category: Thanksgiving
- Method: carving
- Cuisine: American
Keto Thanksgiving dinner recipes
Complete your keto Thanksgiving feast with these low-carb recipes!
Leave a Reply